Zooey Descahnel and Joseph Gordon-Levitt
Friday, December 30, 2011
Spanakopita Snacks! Spinach never tasted so good!

Spanakopita Cups
These are a variation of the traditional Spanakopita Triangles. I had intended on taking them to my MIL's for Boxing Day but there was so much food left over from Christmas that they were never made. I was also going to make them in mini muffin pans but as we had them for dinner I made them in the Texas muffin pans. They are delicious with a dab of plum sauce!
Ingredients:
1 x Small onion chopped
1 x Pack frozen spinach (if using fresh then you'll need 2 bunches)
1 x Pack feta cheese (crumbled)
1 x Cup cottage cheese
1 x Egg
50g Butter melted
8 Sheets Filo Pastry
Method:
1. Preheat oven to 180 degrees celsius
2. Thaw the spinach (in a saucepan or the microwave) and drain as much water out as possible. If using fresh - cut all the white stalk off and shred the spinach. Saute in a pan until quite wilted.
* At this point you can choose to saute your onion to soften it or leave it raw. I leave it raw as it cooks a little in the oven later and has a great little crunch.
3. Combine the spinach, feta cheese, cottage cheese, onion and egg.
4. Lay out 4 of the filo pastry sheets. Using a pastry brush, brush each layer with butter and stack on top of each other. Cut into 4 equal parts.
5. Brush a little butter inside each of the muffin wells of the pan.
6. Place each section of stacked filo into each of the wells. Gently pushing in so there isn't too much overhang outside of the well.
7. Repeat step 4-6 with the other 4 filo sheets and muffin pan.
8. Spoon the spinach mix into the filo cups.
9. Bake in the oven for 20-25 mins.
10. When cooked, let sit in the muffin pan for a minute or two, then gently lift out and place on a plate for immediate devouring! Alternatively set on a cooling rack before packing into a container to take on that picnic or to your friends house!
Saturday, December 24, 2011
Starry Starry Night ... Starry White Christmas

Starry White Christmas
Ingredients:
500g White Chocolate
1/3 cup Pistachios
1/3 cup Glace Cherries
150g Mini Marshmallows
1/4 Shredded Coconut
Method:
1. In a heatproof bowl melt the chocolate over a saucepan of simmering water. Do not let the bowl sit in the water. Use a metal spoon as a wooden spoon may have too much moisture in it.
2. Roughly chop the Pistachio's.
3. Cut the Glace Cherries in half.
4. Mix all ingredients in a medium sized bowl.
5. Line a baking tray with baking paper.
6. Pour the chocolate mix into the tray and press with the back of a spoon.
7. Refrigerate for a few hours
8. When chilled cut into shapes with a star cookie cutter.
Serve!
Christmas Chocolate Bark - Cranberry and Pistachio

Cranberry and Pistachio Chocolate Bark
INGREDIENTS:
500g Milk or Dark Chocolate
300g White Chocolate
1/2 cup Pistachios
1/2 cup Dried Cranberries (Craisins)
METHOD:
1. In separate heat proof bowls melt the milk and white chocolates over simmering water. Do not let the bowls touch the water, use a metal spoon to stir the chocolate (wooden spoons may contain moisture)
2. Roughly chop the Cranberries and Pistachios.
3. Line a baking tray with baking paper or foil.
4. Spread the milk chocolate over the tray. Drizzle the white chocolate over the milk chocolate in parts and around the edges.
5. Using a knife or skewer drag the chocolates into each other to create a marble effect.
6. Sprinkle the Cranberries and Pistachio's over the chocolate and lightly press.
7. Refrigerate for at least 1 1/12 hours. Cut or break into thin strips to eat!
Thursday, December 22, 2011
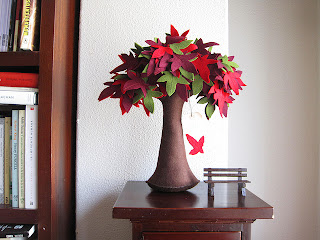
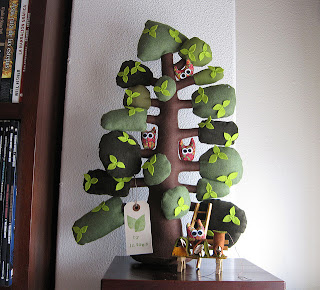
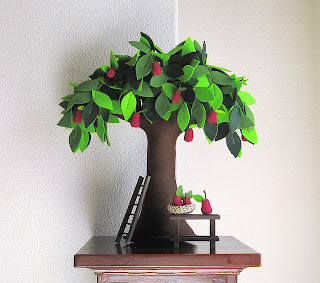
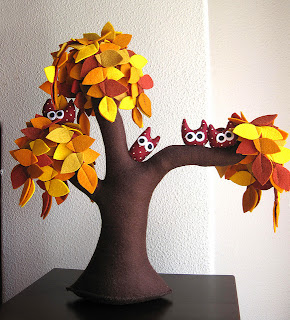
Soft Tree Softies ... Intres ... Moments
O ... M ... G. These beautiful trees were found as I searched google for Christmas Trees.
Maria is a Spanish artist who creates these magic works of art and she has an etsy store here.
Her working name 'Intres' means moments in Spanish. If you think the Trees are gorgeous, wait till you see the houses and towers and people and critters!


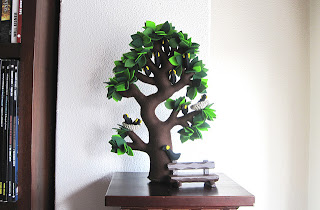
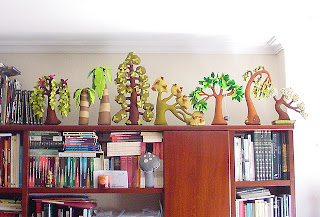


These are so beautiful ...
Maria is a Spanish artist who creates these magic works of art and she has an etsy store here.
Her working name 'Intres' means moments in Spanish. If you think the Trees are gorgeous, wait till you see the houses and towers and people and critters!


These are so beautiful ...
Tuesday, December 20, 2011


Monday, November 28, 2011
DIY Ribbon Bow Tutorial ...
I found this on Pinterest and had to share.
The images below belong to Stitched By Janay. Her blog with the original tutorial is here.
Janay remembered an awesome tutorial she had found via Pinterest.
It utilizes a fork to tie a tiny bow (for wedding invitations and the like).
Janay was using wider ribbon and needed a bigger bow, so she went hunting for something larger with four prongs, and found her potato masher.
Tuesday, November 22, 2011
Tutorial: Christmas Feather Wreath
Christmas Feather Wreath

Materials:
- Small embroidery hoop
- Cream grosgrain ribbon
- Satin ribbon 25cm – 50cm wide
- Pearl buttons
- Cream Turkey Feathers
- Hot-glue gun and hot glue sticks
Instructions:
1. Wrap the embroidery hoop with the grosgrain ribbon leaving a tail at the top to form a loop to hang the wreath.
2. Using the hot glue attach the feathers to the ribbon wrapped hoop
3. Cut the ribbon into strips and using a running stitch gather them into small flower shapes


4. Hot-glue the flower shapes to the feathers and attach the pearl the middle of the flowers


Monday, November 21, 2011
Calling Owl Lovers everywhere ...
Tweet
Shivani is the author of the blog My Owl Barn.
Owl Lover 2012 calendar project is the encore of our last year's "Owl Lover" calendar project - a collaborative project between My Owl Barn and 30 international artists.
Again, "My Owl Barn", and this time 45 artists (likes of Suzy Ultman, Jo James, Juliette Crane and Night Owl Paper Goods) from all over the world are proud to present you our "Owl Lover 2012 calendar".
Like before, you can select the images you love the most and create your own free calendar or you can simply download the pre-made version.
HIGHLY RECOMMENDED!
Click Here to Download your own Owl Lover Calendar 2012 |
Shivani is the author of the blog My Owl Barn.
Owl Lover 2012 calendar project is the encore of our last year's "Owl Lover" calendar project - a collaborative project between My Owl Barn and 30 international artists.
Again, "My Owl Barn", and this time 45 artists (likes of Suzy Ultman, Jo James, Juliette Crane and Night Owl Paper Goods) from all over the world are proud to present you our "Owl Lover 2012 calendar".
Like before, you can select the images you love the most and create your own free calendar or you can simply download the pre-made version.
HIGHLY RECOMMENDED!
Monday, November 14, 2011
TUTORIAL: Recycled Paper Christmas Tree Decoration
Hi! Welcome to the beginning of "Christmas with Kitty Boo Boo". I love a handmade Christmas with all the making and creating and I love sharing the joy of making and creating too. From now through to Christmas I will be sharing some of my Christmas decoration ideas. I hope you find something you like to make and I'd love to hear your feedback and see your versions! Please feel free to link back to my blog!
Note: All instructions and photographs are my own and copyrighted. If you choose to use them please credit them back to me. Thanks
Recycled Christmas Trees with Glitter

Materials:
* Small magazine or book
* Gold Spray Paint
* Glitter
* Scissors
Instructions:
1.
Fold the spine of the magazine so that it is broken
2.
Fold the pages of the magazine in towards the spine
one at a time. Then fold them all in again so the fold is smaller.


3.
Use scissors to cut the irregular shape from the
bottom of the pages. You could leave this attached but if the paper of the
magazine is soft or thin the tree will be unstable


4.
Spray the small tree with
the gold paint and dust with glitter


Now you have a gorgeous
table centerpiece.
Other ideas:
Spray with adhesive glue
(so you can still see the text) and then sprinkle with glitter
Friday, November 4, 2011
Halloween at the House of Boo
alloween (a shortening of All Hallows’ Evening), also known as Hallowe'en or All Hallows' Eve, is a yearly holiday observed on October 31, the night before All Saints' Day. Much like Day of the Dead celebrations, the Christian feast of All Hallows' Eve, according to some scholars, incorporates traditions from pagan harvest festivals and festivals honouring the dead, particularly the Celtic Samhain; other scholars maintain that the feast originated entirely independently of Samhain.


Wednesday, October 26, 2011
Kitty Boo Boo at Street Candy's Twisted Candy at the Basement
Sadly I was unable to attend this event but judging by the blog post and gallery photos it was a night to remember!

Please drop over to Street Candy and check out all the info on the first event Street Candy have hosted - Twisted Candy at The Basement.
Kitty Boo Boo had the pleasure of being one of the fashion highlights along with Emetic, Dead End Dames, Beserk Clothing,and Scarlette Menagerie.

Please drop over to Street Candy and check out all the info on the first event Street Candy have hosted - Twisted Candy at The Basement.
Kitty Boo Boo had the pleasure of being one of the fashion highlights along with Emetic, Dead End Dames, Beserk Clothing,and Scarlette Menagerie.
Friday, September 23, 2011
Turning Kids Art into Mini Quilts!
Pirate Sam and I decided we needed to make something fun and different. Sam has had a unit at Prep based around Pirates so he has been drawing maps like crazy. Pirate Island, Treasure Smeasure, Feather Island and Skull Island to name a few.
I am not the world's best quilter, I don't seem to have that certain amount of patience that is required. But mini quilts, they are my thing!
So Sam and I decided to turn a Treasure map into a mini quilt that he can use and we can wash if it gets dirty. (He gets a bit sad when paper tears)

To start we needed a Treasure Map. Once you have a map you can work out what you need to create it's 3D counterpart.

You'll need:
1 x piece of fabric for your island
1 x piece of fabric for your front
1 x piece of fabric for the back
1 x piece of wadding ( I chose a piece of Thermolan as it will wash well)
1 x embroidery hoop (not really needed but helps keep stitches regular)
needle
embroidery thread
scissors
transfer pen or pencil for fabric (mine is air soluble)
tracing paper if you like
ribbon for tying map scroll together
sewing machine
iron or press
1. Trace your image onto your island fabric

2. Embroider the line work using simple stitches like back stitch or chain stitch. Try not to change any part of the kids work. The imperfections bring the charm!


4. Applique the island to the front piece using a zig zag stitch

5. We'll be stitching our quilting stitches in a grid to represent the longitude and latitude lines of a map. Pin the front piece to the wadding and stitch evenly spaced lines in one direction, either vertical or horizontal.
6. Pin this piece to the backing piece and then stitch the lines in the opposite direction to the lines you just stitched. Completing the grid effect on the front but leaving only one direction of lines on the back.


I am not the world's best quilter, I don't seem to have that certain amount of patience that is required. But mini quilts, they are my thing!
So Sam and I decided to turn a Treasure map into a mini quilt that he can use and we can wash if it gets dirty. (He gets a bit sad when paper tears)

To start we needed a Treasure Map. Once you have a map you can work out what you need to create it's 3D counterpart.

You'll need:
1 x piece of fabric for your island
1 x piece of fabric for your front
1 x piece of fabric for the back
1 x piece of wadding ( I chose a piece of Thermolan as it will wash well)
1 x embroidery hoop (not really needed but helps keep stitches regular)
needle
embroidery thread
scissors
transfer pen or pencil for fabric (mine is air soluble)
tracing paper if you like
ribbon for tying map scroll together
sewing machine
iron or press
1. Trace your image onto your island fabric

2. Embroider the line work using simple stitches like back stitch or chain stitch. Try not to change any part of the kids work. The imperfections bring the charm!


3. Press the island piece using an iron and then cut out the island. Pin it to your front piece.

4. Applique the island to the front piece using a zig zag stitch

5. We'll be stitching our quilting stitches in a grid to represent the longitude and latitude lines of a map. Pin the front piece to the wadding and stitch evenly spaced lines in one direction, either vertical or horizontal.
6. Pin this piece to the backing piece and then stitch the lines in the opposite direction to the lines you just stitched. Completing the grid effect on the front but leaving only one direction of lines on the back.


7. Now use quilt binding around the edge to border the quilt. Whilst binding the quilt attach the ribbon at one side so the map can be tied like a scroll.
ENJOY!

Subscribe to:
Posts (Atom)